A granite worktop is often the centrepiece of a kitchen, prized for its durability and timeless beauty. But beyond its stunning appearance, functionality is key to a truly efficient space. One feature that perfectly marries practicality with sophisticated design is custom drainage grooves. These subtle yet highly effective additions can transform how you use your sink area, keeping it drier, cleaner, and more organised.
So, what are drainage grooves? In simple terms, they’re channels carefully cut into the surface of your granite worktop, typically alongside your sink. Their primary job is to direct water from washed dishes or wet hands straight into the sink bowl, preventing it from pooling on your worktop. This not only helps to maintain the pristine condition of your granite but also contributes to a more hygienic kitchen environment.
In this guide, we’ll delve into the world of custom drainage grooves, exploring everything from the basic concept to the array of designs available – including popular styles like Straight, Dog Leg, Fishtail, Leaf, Rainbow, and Retainer grooves. We’ll also cover the practical aspects of their fabrication, maintenance, and how to choose the perfect design for your kitchen. Get ready to discover how these elegant channels can add a touch of genius to your granite worktop.

Understanding Drainage Grooves: The Basics and Beyond
Before we explore the exciting design possibilities, let’s get to grips with what drainage grooves are and why they’re such a popular feature in modern kitchens, especially with a material as robust and beautiful as granite.
What Exactly Are Drainage Grooves and How Do They Work?
At its most basic, a drainage groove is a shallow channel or recess cut into a worktop surface.
Think of them as mini-slopes or pathways carved into your worktop next to the sink. When water lands on this area, these grooves guide it directly into the sink, much like tiny gutters.
More precisely, drainage grooves are precision-cut indentations engineered with a slight, almost imperceptible slope or gradient towards the sink. This gradient is crucial; it utilises gravity to ensure that water doesn’t sit stagnant but instead flows efficiently away. The effectiveness of these grooves depends on their depth, width, angle, and the smoothness of the cut. They are typically created using specialised machinery for accuracy.
Drainage Grooves Purpose
The primary purpose of these grooves is multi-faceted:
- Preventing Water Pooling: This is their most obvious job. By channelling water away, they stop puddles from forming, which can be unsightly and, over time, could contribute to issues in less resilient worktop materials (though granite is very resistant).
- Protecting Your Worktop Investment: While granite is incredibly durable, minimising standing water helps maintain its sealant and overall appearance long-term.
- Enhancing Hygiene: Less standing water means fewer opportunities for bacteria or mould to develop, contributing to a cleaner food preparation area.
- Creating a Dedicated Draining Space: They effectively turn a section of your flat worktop into a functional drainer board without needing a separate, often cumbersome, accessory.
Why Opt for Drainage Grooves in Granite?
Granite is an excellent candidate for several reasons:
- Inherent Durability: Granite is a hard, natural stone that can withstand the precision cutting required for grooves without compromising its structural integrity, provided it’s done professionally. Its low porosity also means it’s less susceptible to water damage than other materials.
- Seamless Aesthetics: Integrating grooves directly into the granite creates a sleek, uninterrupted look. This is a significant advantage over separate draining boards, which can clutter the worktop and disrupt the visual flow of the stone. This seamless integration is particularly valued in contemporary and minimalist kitchen designs.
- Space Efficiency: For smaller kitchens, eliminating the need for a separate drainer can free up valuable worktop space. The area with grooves can still be used as a regular surface when dry.
- Customisation Potential: Granite can be fabricated to include a wide variety of groove designs, allowing homeowners to match their preferences and functional needs.
Addressing Common Concerns:
Cleaning: Some worry that grooves might be hard to clean. While intricate designs might require a little more attention, most standard groove patterns are relatively easy to wipe down, especially in a polished granite finish. We’ll cover cleaning in detail later.
Weakness: A common misconception is that cutting grooves might weaken the granite. When fabricated correctly by experienced professionals using appropriate techniques such as ours, drainage grooves do not compromise the stone’s strength. The depth of the grooves is minimal relative to the overall thickness of the slab.
Opting for drainage grooves in granite is about enhancing an already premium material with added, built-in functionality that complements its natural beauty.

Exploring the Array of Drainage Groove Designs
One of the most exciting aspects of choosing drainage grooves for your granite worktop is the variety of designs available. From understatedly functional to elegantly ornate, there’s a style to suit every kitchen aesthetic and practical requirement.
Classic and Contemporary Styles: Finding Your Perfect Match
The choice of drainage groove design can significantly influence the overall look of your sink area. It’s not just about function; it’s a design detail that contributes to your kitchen’s character. Several factors might influence your design choice:
- Kitchen Style: A minimalist, modern kitchen might suit sleek, straight grooves, while a traditional or country-style kitchen could accommodate more decorative patterns like Leaf or Fishtail.
- Sink Type and Size: The size and shape of your sink (e.g., undermount, Belfast, single or double bowl) can influence the optimal layout and length of the grooves.
- Usage Habits: How much do you hand wash? If it’s a lot, you might want a larger area with more grooves or a design that maximises water capture.
- Personal Preference: Ultimately, the design should appeal to you and complement your vision for your kitchen.
Spotlight on Popular Drainage Groove Types
Let’s take a closer look at some of the most popular drainage groove designs, including those you might have seen in showrooms or, like the ones referenced from the provided image, from fabricators’ portfolios. Each has its unique characteristics:

Straight Grooves
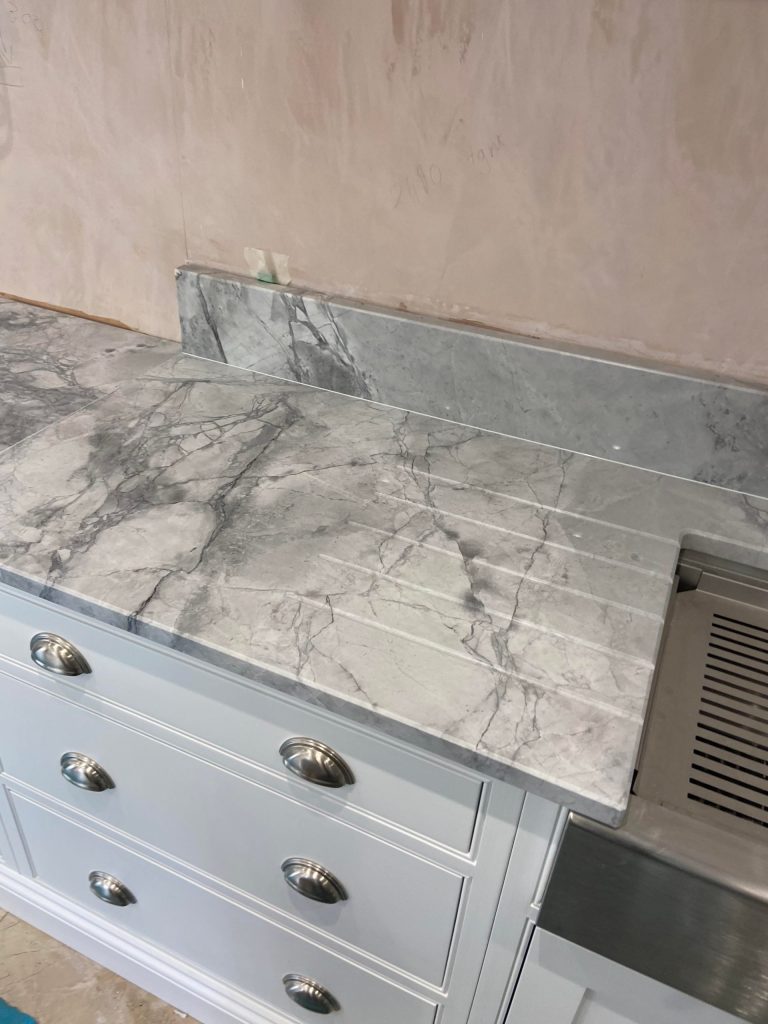
These are the most common and straightforward design, featuring a set of parallel, linear channels running from the edge of the draining area directly towards the sink. They are typically of equal length.
Best suited for: Modern, contemporary, and minimalist kitchens where clean lines are paramount. They also work well in smaller spaces due to their unfussy appearance.
Pros:
- Easy to clean: Their simple geometry makes wiping them down quick and effortless.
- Efficient drainage: Water flows directly and predictably to the sink.
- Timeless look: Their simplicity ensures they won’t easily look dated.
- Cost-effective: Generally the least complex to fabricate, which can be reflected in the price.
Cons:
- Some might find them too plain or industrial-looking for more traditional or ornate kitchen styles.
Grooves are typically 5-10mm wide and 3-5mm deep. The set usually consists of five or six grooves, but this can be customised. The length will vary depending on the available space next to the sink.

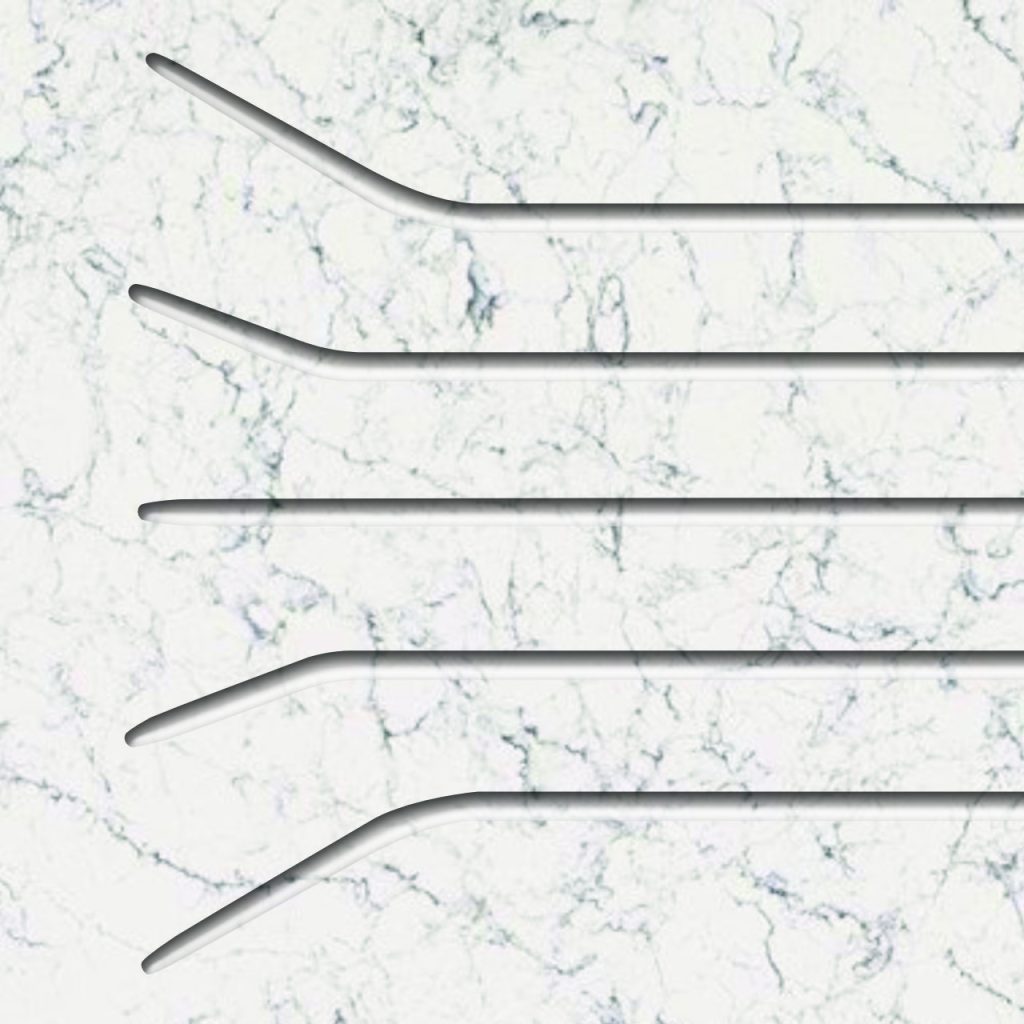
Dog Leg Grooves
Dog Leg grooves start as straight, parallel channels but then feature an angled turn (the “dog leg”) that directs them more acutely towards the sink. This bend is usually closer to the sink end of the grooves.
Best suited for: Kitchens where a slightly more dynamic look than simple straight grooves is desired, or where the sink placement benefits from a more targeted water flow. They can bridge the gap between purely functional and subtly decorative.
Pros:
- Enhanced water channelling: The angle can help ensure water makes its final journey into the sink more effectively, especially if the main set of grooves is slightly offset from the sink edge.
- Slightly more visual interest: The angled element adds a touch of design flair without being overly complex.
Cons:
- The corner or bend in each groove can be a point where debris or limescale might accumulate slightly more than in a perfectly straight groove, requiring a little extra attention when cleaning.
The angle of the ‘leg’ can vary, but it’s typically around 30-45 degrees. The length of the straight section versus the angled section can also be customised.
Fishtail Grooves
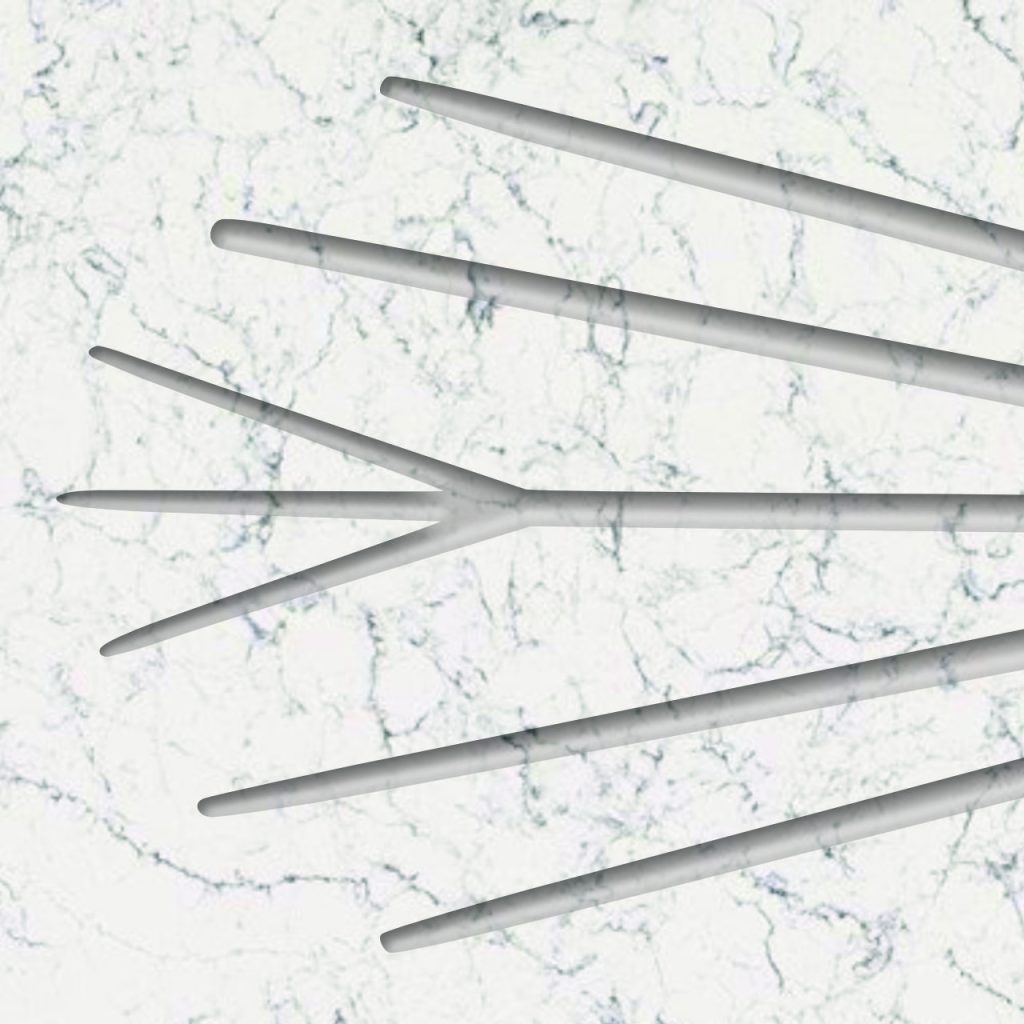
Fishtail grooves, also known as splayed or fan-splayed grooves, are wider apart at the worktop edge furthest from the sink and converge or taper as they approach the sink. This creates a shape reminiscent of a fishtail or a fanned hand of cards.
Best suited for: Kitchens aiming for a touch of elegance and a slightly more decorative feel. They work well in both traditional and transitional styles.
Pros:
- Good water capture: The wider spread at the outer edge can help catch water over a larger initial area.
- Aesthetically pleasing: Many find this design more visually interesting and softer than straight grooves.
Cons:
- Can be slightly more complex to fabricate accurately than straight grooves, which might influence the cost.
- Cleaning the converging points needs a bit of care.
Technical details: The degree of splay (the angle at which the grooves spread out) is a key design element. The number of grooves typically ranges from five to seven.
Leaf Grooves (or Fan Grooves)
Leaf grooves, sometimes called Fan grooves, radiate outwards from a point near the sink, often resembling the veins of a leaf or the ribs of an open fan. They are curved and splay out to cover a wider draining area.
Best suited for: Kitchens with organic, traditional, or country themes. They make a definite design statement and are often chosen for larger drainer areas where their pattern can be fully appreciated.
Pros:
- Visually striking: This is one of the more decorative options and can become a focal point.
- Effective drainage over a broad area: The fanning pattern covers a good surface area.
Cons:
- More intricate to clean: The curves and varying spaces between grooves can trap more debris and require more detailed cleaning.
- Design complexity: This is a more complex pattern to fabricate, often leading to a higher cost.
The design involves precise curvature and tapering of each groove. The spacing between grooves widens as they extend from the sink.

Rainbow Grooves (or Curved/U-Shaped Grooves)
Rainbow grooves consist of a series of concentric curved channels, typically forming a semi-circle or a broad U-shape around the side of the sink. They create a flowing, wave-like appearance.
Best suited for: Kitchens where a softer, more fluid aesthetic is desired. They can beautifully complement curved kitchen units, island ends, or sinks with rounded corners.
Pros:
- Unique design statement: Offers a distinctive and elegant look that differs significantly from linear patterns.
- Softens the look: The curves can add a gentle, organic feel to the hard granite surface.
Cons:
- Fabrication complexity: These are among the most complex designs to cut accurately, often involving sophisticated CNC programming, and therefore can be the most expensive.
- Cleaning challenge: Cleaning along the curves and ensuring all parts of the U-shape are reached requires more effort. Water can sometimes sit at the lowest point of the ‘U’ if the slope isn’t perfect across the entire curve.
Requires precise calculation of multiple radii to ensure consistent groove depth and spacing along each curve. The overall width and depth of the rainbow pattern can be tailored.
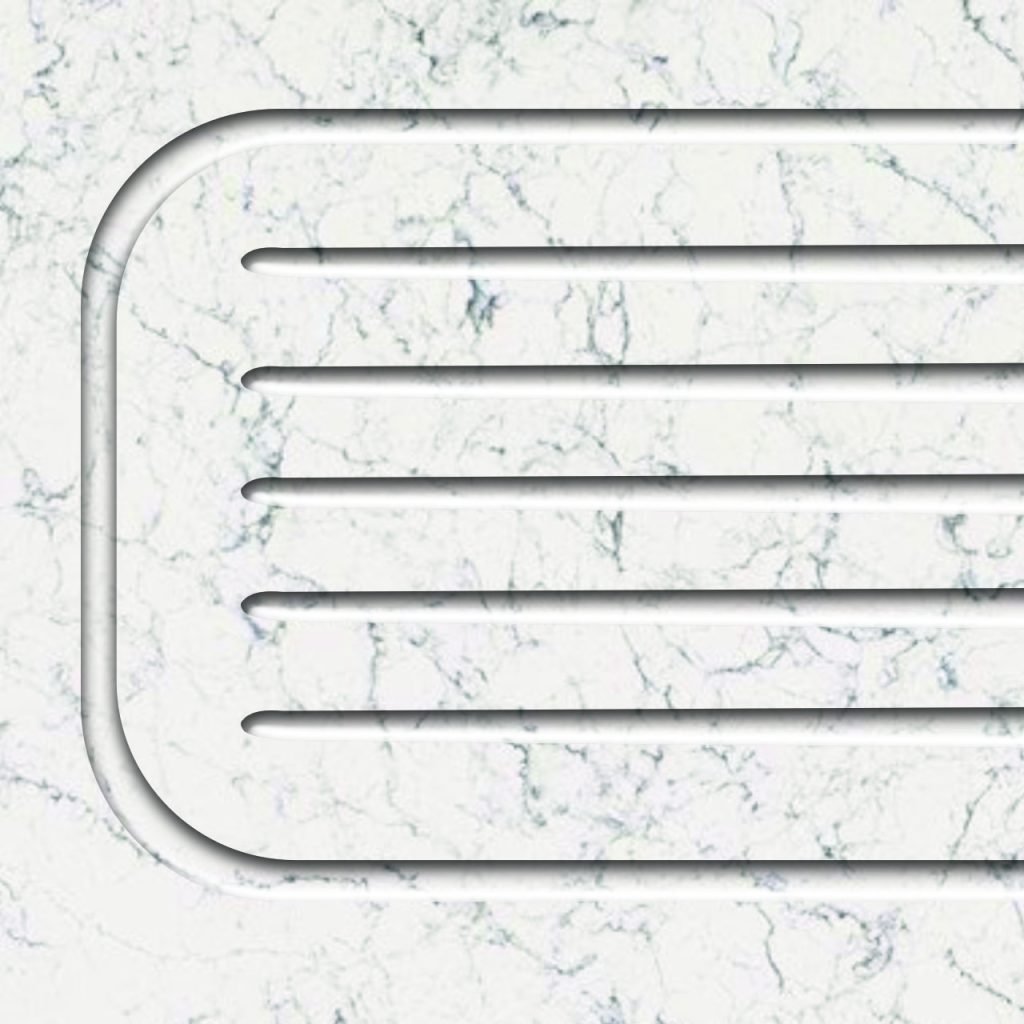
Retainer Grooves (or Boxed/Framed Grooves)
This design features a set of primary drainage grooves (often straight, but could be another pattern) that are entirely enclosed by a single, continuous perimeter groove. This outer groove acts like a frame or a barrier.
Best suited for: Situations where maximum water containment on the designated drainer area is crucial. It’s a very practical design for busy kitchens or for those who want a clearly defined wet zone.
Pros:
- Excellent water control: The outer retainer groove is very effective at preventing water from escaping the drainer area and spilling onto the main worktop surface.
- Clearly defined drainer zone: The frame visually and functionally separates the wet area.
Cons:
- The perimeter groove itself, especially its corners, can be a point where water or grime collects and needs diligent cleaning.
The retainer groove is usually slightly deeper or wider than the internal grooves to ensure it can effectively hold and channel any overflow from them towards the sink.
Beyond the Standards: Customisation and Bespoke Designs
While these popular styles offer plenty of choices, the beauty of granite fabrication, especially with modern technology, is the potential for customisation.
Can you design your own drainage grooves? To some extent, yes. You can often specify the number of grooves, their length, and sometimes minor variations on standard patterns. For entirely unique, bespoke designs, it depends on the fabricator’s capabilities and your budget.
Working with fabricators: Discuss your ideas with your granite fabricator. They can advise on what’s feasible, practical, and how your design might impact cost and cleaning. They might use CAD (Computer-Aided Design) software to show you a mock-up.
Considerations for fully custom designs:
- Practicality: An overly intricate design might look amazing but be a nightmare to clean or not drain effectively.
- Cost: The more complex and non-standard the design, the higher the fabrication cost will likely be.
- Fabrication limits: There are physical limitations to how finely granite can be cut and shaped.
Choosing a drainage groove design is a balance between aesthetics, functionality, ease of maintenance, and budget. The styles mentioned provide a fantastic starting point for finding the perfect fit for your granite worktop.
The way we do it is, you send us a drawing, we’ll produce a detailed CAD drawing and send you a copy for approval. Once you’ve approved your final design, we’ll begin fabricating your custom drainage grooves, as part of your kitchen worktops fabrication project.
Above: Straight groove/dog-leg combo we produced for a client’s custom requirements.
How Are Drainage Grooves Made in Granite? The Fabrication Process
Creating drainage grooves in a hard material like granite is a precise process that requires specialised tools and expertise. It’s not a DIY job.
Specialist stonemasons use powerful, precise cutting machines to carefully carve the grooves into the granite slab before it’s installed in your kitchen.
The vast majority of high-quality drainage grooves today are created using CNC (Computer Numerical Control) machining.
- Design Input: The desired groove pattern (straight, fishtail, custom, etc.), including dimensions like length, width, depth, and spacing, is programmed into a CAD (Computer-Aided Design) system.
- Machine Setup: The granite slab is securely positioned on the CNC machine’s bed.
- Cutting: The CNC machine is equipped with diamond cutting tools (bits or blades impregnated with industrial diamonds). Following the programmed path, the machine precisely cuts or grinds out the grooves. The use of water coolant is essential during this process to prevent overheating of the tool and the stone, and to manage dust.
- Slope Creation: The slight slope needed for drainage is also programmed and achieved by the CNC machine, either by tilting the cutting head or the machine bed, or by varying the cutting depth along the groove’s length.
- Polishing: After cutting, the inside surfaces of the grooves are typically polished to match the finish of the main worktop surface (e.g., polished, honed). This is important for both aesthetics and ease of cleaning, as a smooth surface is less likely to trap dirt. This can be done by the CNC machine with polishing heads or by hand with specialised tools.
The importance of professional fabrication cannot be overstated. Experienced granite fabricators understand the stone’s properties and have the right equipment to create clean, accurate grooves without chipping or damaging the granite.
Key Design Considerations for Optimal Performance
For drainage grooves to be truly effective, several design elements must be carefully considered:
Slope and Gradient:
This is paramount. Water needs to flow naturally towards the sink.
An ideal slope is typically very subtle, often around 1 to 2 degrees, or a fall of a few millimetres over the length of the grooves. Too steep, and it might look odd or cause water to run off too quickly, potentially splashing. Too shallow, and water may pool.
Depth and Width:
This is a balance between functionality and aesthetics.
- Groove Depth: Usually between 3mm and 5mm. Too shallow, and they won’t channel much water. Too deep, and they can become dirt traps or feel awkward if you rest items on them.
- Groove Width: Commonly between 5mm and 10mm. Wider grooves can carry more water but might look more prominent.
- Impact on cleaning: Very narrow or very deep grooves can be harder to clean thoroughly.
Length and Number of Grooves:
This should be proportionate to the available space and your needs.
Longer grooves provide more draining area. A standard set often includes five or six grooves. Too many closely packed grooves can look cluttered and be harder to clean between.
Edge Profile Compatibility: If your worktop has a decorative edge profile (e.g., ogee, bullnose), the start of the grooves needs to integrate smoothly with this, or be set back slightly.
Proximity to Sink and Sink Type:
- For undermount sinks, grooves typically run right up to the polished cut-out edge of the sink.
- For inset sinks (drop-in sinks with a lip), the grooves will stop just short of the sink’s lip.
- For Belfast sinks, which often have their own integrated drainer or a specific style, the groove placement needs careful planning to complement the sink’s design.
Can Drainage Grooves Be Added to Existing Granite Worktops?
This is a common question, and the answer is: it’s sometimes possible, but often challenging and not always recommended.
Feasibility and Challenges:
On-site fabrication: Cutting grooves into an already installed worktop is a messy, dusty process. It requires specialised portable equipment and a highly skilled technician. Containing the dust and slurry (water mixed with stone particles) is very difficult in a finished kitchen.
Risk of damage: There’s a higher risk of chipping the granite or damaging surrounding units/walls when working on-site.
Matching the finish: Achieving the same level of polish within the grooves as the original factory-finished worktop surface can be difficult on-site.
Structural considerations: The existing worktop must be thick enough and well-supported.
Workshop vs. On-site: Ideally, drainage grooves are fabricated in the workshop before the worktop is installed. This allows for better precision, dust control, and finishing.
Recommendation: Most reputable granite fabricators are hesitant to add grooves to existing installations due to these challenges and potential for unsatisfactory results. It’s generally better and more cost-effective to incorporate them into a new worktop plan. If it is attempted, ensure the company has explicit experience with on-site retrofitting.

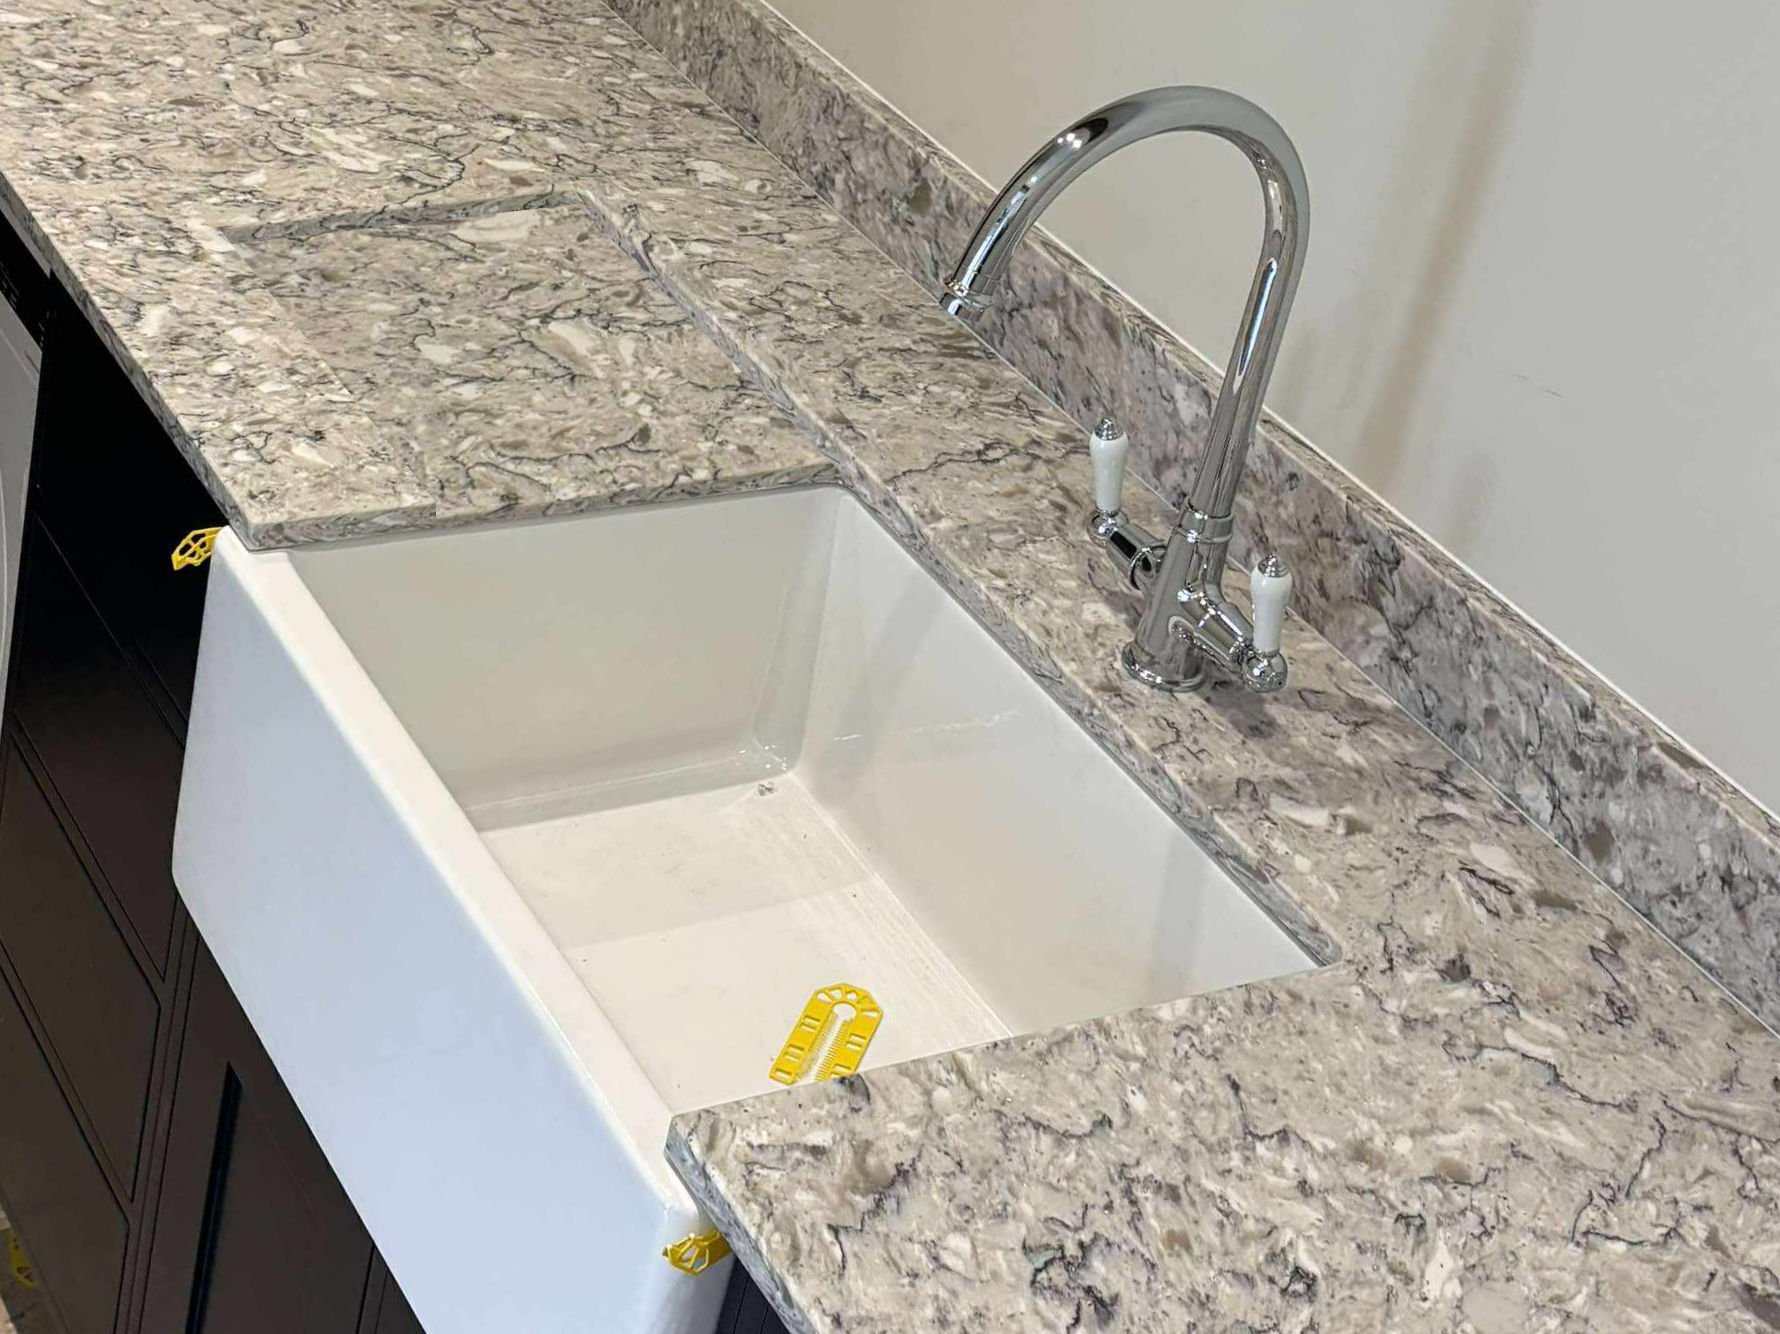
Above: A polished sink cutout with double drainage grooves for versatility that we produced.
Understanding the Cost Implications
Adding drainage grooves will increase the overall cost of your granite worktop.
Factors affecting price:
- Complexity of design: Simple straight grooves are the least expensive. More intricate patterns like Rainbow or Leaf grooves require more programming and machining time, thus costing more.
- Length and number of grooves: More grooves or longer grooves mean more machining.
- Fabricator expertise and equipment: Highly skilled fabricators with top-of-the-line CNC machinery may charge more, but the quality is usually worth it.
- Granite type: While not directly related to the groove cost, the overall project price will vary based on the granite chosen.
Are they a worthwhile investment?
For many, the added functionality, improved hygiene, and enhanced aesthetics are well worth the extra cost. They can also add to the perceived value of your kitchen if you decide to sell your home. A typical set of straight drainer grooves might add anywhere from £300 to £500 to the worktop cost, with more complex designs potentially costing more. This is an indicative range and will vary significantly between suppliers.
Getting quotes:
When getting quotes for granite worktops, always specify if you want drainage grooves and what style you’re considering. Ask for this to be itemised. Enquire about the typical depth, width, and slope they use.
Careful planning and professional execution are key to ensuring your drainage grooves are both beautiful and perfectly functional.
Living with Your Drainage Grooves: Maintenance and Care
Once your stunning granite worktop with integrated drainage grooves is installed, you’ll want to keep it looking its best. Thankfully, granite is a low-maintenance material, and caring for the grooves is generally straightforward.
Keeping Your Granite Drainer Grooves Clean and Hygienic
Regular, simple cleaning is the best way to prevent build-up and keep your grooves pristine.
Daily Cleaning Tips:
Wipe down regularly: After doing the dishes or when you notice water in the grooves, simply wipe them down with a soft, absorbent cloth (a microfibre cloth works well). Wipe along the length of the grooves towards the sink.
Use pH-neutral cleaners: If you need more than water, use a pH-neutral cleaner specifically designed for stone, or a mild dish soap diluted in warm water. Avoid harsh, acidic, or abrasive cleaners (like vinegar, lemon juice, or scouring powders) as these can etch the granite or damage the sealant over time.
Rinse and dry: After cleaning with soap, rinse the area with plain water and wipe dry to prevent soap scum or water spots.
Dealing with Hard Water Build-up or Stains:
Limescale (Hard Water Deposits): In hard water areas, you might notice a white, chalky build-up.
Simplified solution: A paste of bicarbonate of soda and water, gently scrubbed with a soft brush (like an old toothbrush) along the grooves, can often lift these deposits. Rinse thoroughly.
Specialist cleaners: For stubborn limescale, use a cleaner specifically formulated for granite that targets mineral deposits. Always test in an inconspicuous area first.
Food Stains: Granite is stain-resistant, especially when properly sealed, but it’s best to wipe up spills (like wine, coffee, or oil) promptly. If a stain does occur in a groove, try the bicarbonate of soda paste or a poultice as recommended for granite surfaces.
Tools for Cleaning Grooves:
Soft cloths: For general wiping.
Soft brushes: An old toothbrush or a small, soft-bristled washing-up brush is ideal for getting into the grooves without scratching the granite.
Avoid steel wool or abrasive pads.
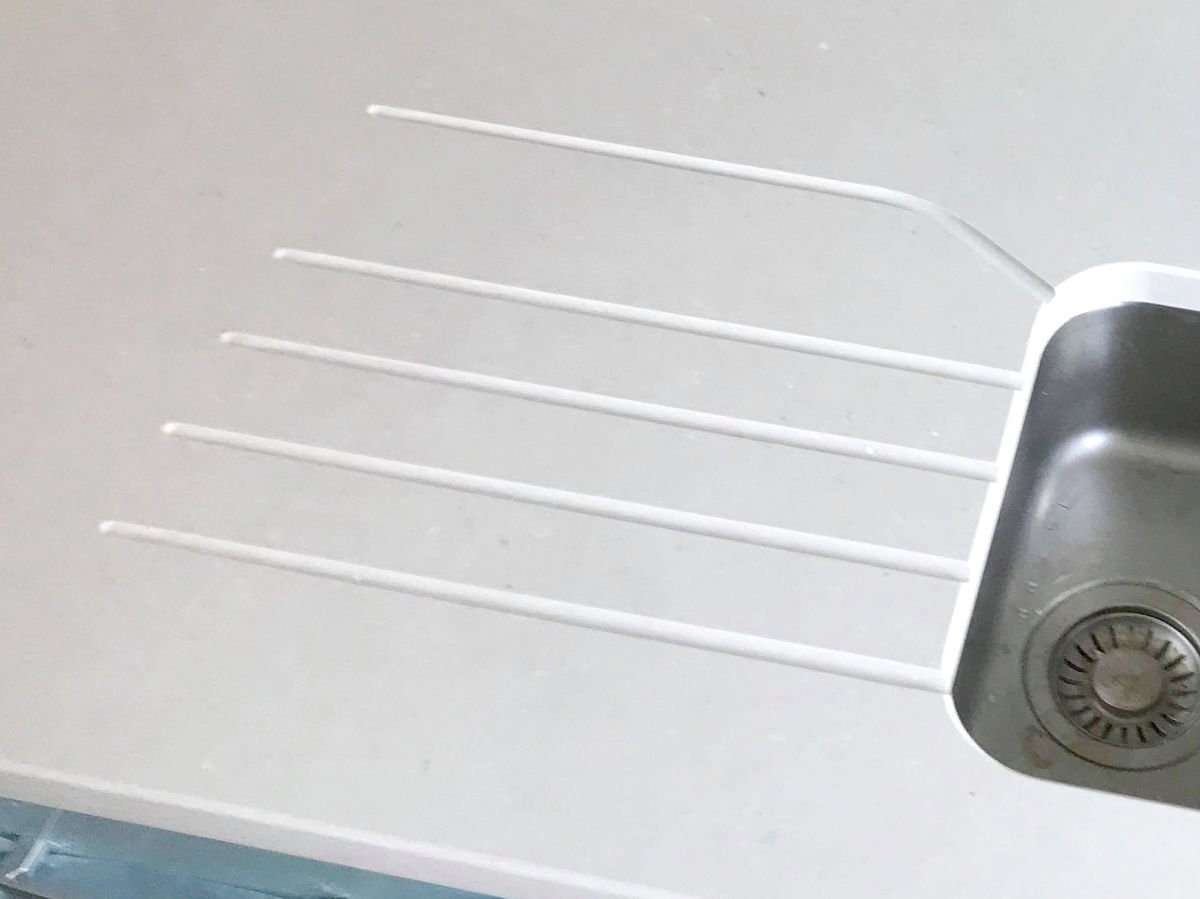
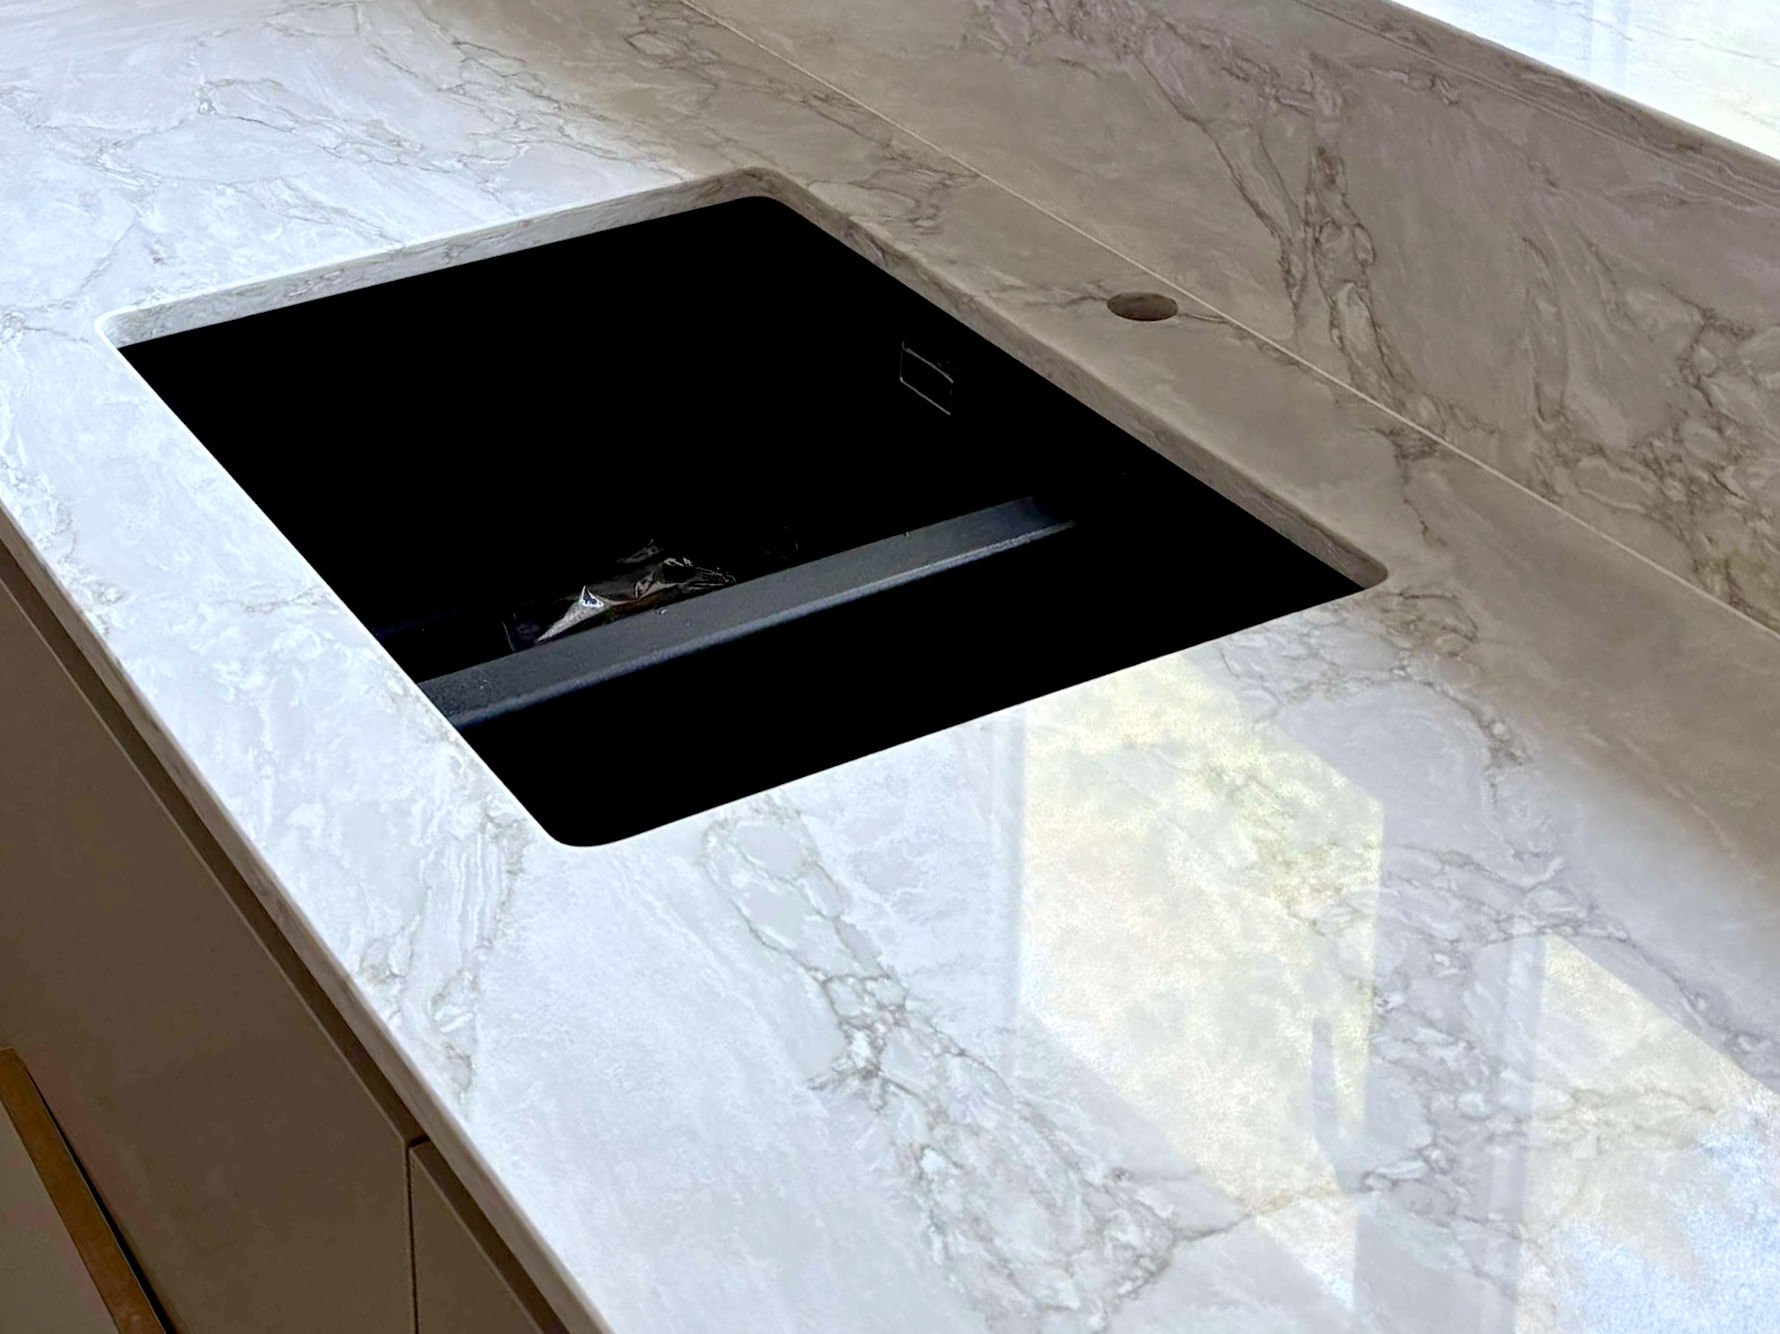
Above: Straight drainage grooves we cut into a natural quartzite stone worktop as part of a kitchen worktop fabrication and installation.
Long-Term Care for Granite Worktops with Drainage Grooves
A little attention goes a long way in preserving the beauty and functionality of your granite and its grooves.
Sealing Granite:
Most granite worktops are sealed upon installation to enhance their stain resistance.
Does it affect the grooves? The sealant is applied to the entire surface, including within the grooves. This helps protect them too.
Re-sealing: Granite typically needs re-sealing periodically (e.g., every 1-5 years, depending on the type of granite and sealant used). Your fabricator will advise on this. Ensure the grooves are clean and dry before re-sealing.
Avoiding Damage:
Chips: While granite is hard, a heavy object dropped with force directly onto the edge of a groove could potentially cause a small chip. Be mindful when handling heavy pots and pans.
Scratches: Granite is highly scratch-resistant, but not entirely scratch-proof. Avoid dragging very hard or sharp objects across the grooved area.
Professional Maintenance or Repair: If a groove does get chipped, or if you have stubborn staining, it’s best to contact a professional stone care specialist. They have techniques to repair minor damage and deep clean stone surfaces.
Do Drainage Grooves Weaken the Granite?
This is a common concern, but it’s largely a misconception when grooves are fabricated correctly.
Addressing the Misconception: High-quality granite is an incredibly strong and dense natural stone. The grooves are relatively shallow (typically 3-5mm deep) compared to the overall thickness of a standard granite worktop (usually 20mm or 30mm).
Proper Fabrication Techniques: Reputable fabricators use precise CNC machinery that cuts the grooves smoothly without creating stress points. They also understand the specific properties of the granite they are working with.
Minimum Granite Thickness: Drainage grooves are generally recommended for worktops that are at least 20mm thick, with 30mm being even more robust. Fabricators will advise if a particular type of granite or a thinner slab is unsuitable for grooving.
With proper fabrication and sensible care, your drainage grooves will not compromise the structural integrity of your granite worktop and will serve you well for many years.
Alternatives to Integrated Drainage Grooves
While integrated drainage grooves in granite offer a sleek and permanent solution, they aren’t the only option for managing water around your sink. It’s worth knowing the alternatives to make an informed decision.
Separate Draining Boards: Pros and Cons
These are removable trays or boards that sit on top of your worktop next to the sink.
Materials: Commonly made from stainless steel, plastic, silicone, bamboo, or even a separate small piece of granite or composite stone.
Pros:
- Flexibility: Can be removed when not in use to free up worktop space.
- Portability: Can be moved or stored away.
- No permanent alteration: No cutting into the main worktop is required.
- Variety of styles and prices: Widely available in many designs and price points.
Cons:
- Can look cluttered: They add an extra item to the worktop surface.
- Water can get trapped underneath: If not lifted and dried regularly, moisture can accumulate beneath them, potentially leading to mildew or staining on some worktop types (less of an issue with well-sealed granite, but still a hygiene consideration).
- May not match perfectly: Finding one that perfectly complements your granite can be tricky.
- Can slip or move: Some lighter models may not stay securely in place.
Recessed Drainer Areas (Sunken Drainers)
This involves creating a larger, gently sloped area in the granite worktop that is recessed or “sunken” slightly below the main worktop level. This area then directs water towards the sink.
Aesthetic and Functional Differences:
- Instead of individual channels, the entire section of stone is sloped.
- It can provide a larger continuous area for draining.
- The look is different – it’s a more substantial alteration to the worktop plane.
- Fabrication is complex and can be more expensive than standard grooves.
- Cleaning is generally straightforward as it’s a smooth, sloped surface.
- Some find it offers a more “integrated” feel than grooves, while others prefer the distinct lines of grooves.
No Drainer: The Minimalist Approach
Some people opt for no dedicated drainer area at all, especially in very minimalist kitchens or if they primarily use a dishwasher.
Relying on Dish Racks or Drying Mats: Water management relies on using a dish rack that collects water in a tray, or highly absorbent drying mats placed on the worktop when needed.
Suitability:
- Can work for individuals or couples who wash few items by hand.
- Requires discipline in wiping down the worktop immediately after use to prevent water spots or pooling.
- Offers the cleanest, most uninterrupted worktop look.
- Not ideal for busy family kitchens with lots of hand-washing.
Each alternative has its place. Integrated drainage grooves, however, remain a popular choice for those seeking a permanent, stylish, and highly functional solution built directly into their luxurious granite worktops.
Making the Right Choice: Are Drainage Grooves for You?
Deciding whether to incorporate drainage grooves into your granite worktop is a personal choice that depends on your priorities, kitchen habits, and aesthetic preferences. Let’s recap the key points to help you decide.
Recap of Benefits: Why They Shine
Drainage grooves offer a compelling combination of advantages:
- Enhanced Practicality: They efficiently channel water away, keeping your sink area drier and more usable.
- Improved Hygiene: Reducing standing water helps prevent the growth of bacteria and mould.
- Sleek Aesthetics: Integrated grooves offer a seamless, uncluttered look that complements the beauty of granite.
- Space-Saving: They eliminate the need for a separate draining board, freeing up valuable counter space. This is especially beneficial in smaller kitchens.
- Durability: When professionally fabricated in granite, they are a long-lasting feature.
- Potential Property Value: A well-designed kitchen with thoughtful features like drainage grooves can be an attractive selling point.
Potential Downsides to Consider
It’s also important to be aware of potential drawbacks:
- Additional Cost: They represent an extra expense on top of the granite worktop itself.
- Cleaning (for some designs): While generally easy to clean, more intricate patterns (like Leaf or some Rainbow designs) can require a bit more attention to detail to prevent build-up in crevices.
- Permanence: Once cut, they are a permanent feature. If your needs or tastes change dramatically, altering them isn’t straightforward.
- Potential for Chipping (if mistreated): Like any part of a stone worktop, the edges of grooves can be chipped if subjected to sharp, heavy impacts, though granite is very resilient.
Matching Grooves to Your Kitchen Style and Needs
Consider how different groove designs align with your overall kitchen vision:
- Modern/Minimalist: Straight or Dog Leg grooves often work best, offering clean lines.
- Traditional/Country/Farmhouse: Fishtail, Leaf, or even subtle Rainbow grooves can add character and complement these styles. Retainer grooves offer a classic, very functional look.
- Transitional: Many styles, including Fishtail or simpler custom patterns, can bridge the gap.
Also, think about your usage:
- High-use kitchens (lots of hand-washing): A larger set of grooves, or a design like Retainer grooves for maximum containment, might be beneficial.
- Low-use kitchens (primarily dishwasher users): A smaller, simpler set of grooves might suffice, or you might even consider alternatives.
Consulting with Granite Professionals
This is perhaps the most crucial step.
The importance of expert advice: Experienced granite fabricators have seen countless kitchens and can offer invaluable guidance. They can show you samples, discuss the pros and cons of different designs in relation to your chosen granite, and explain the fabrication process.
What to discuss with your fabricator:
- Show them any images or ideas you have (like the specific groove types you’re interested in).
- Discuss your sink type and kitchen layout.
- Ask about their recommendations for slope, depth, and number of grooves.
- Clarify the cost implications for different designs.
- Enquire about their CNC capabilities and finishing processes.
- Ask to see examples of their previous work.
A good fabricator will work with you to ensure the drainage grooves are not only beautiful but also perfectly functional for your specific needs.
Conclusion: The Perfect Finish to Your Granite Worktop
Custom drainage grooves are more than just a practical feature; they’re a mark of thoughtful kitchen design. They represent an elegant fusion of form and function, transforming a simple slab of granite into a more efficient and sophisticated workspace. By guiding water effortlessly into the sink, they help maintain the pristine beauty of your worktop, enhance hygiene, and offer a sleek, integrated alternative to traditional draining boards.
Whether you opt for the clean simplicity of Straight grooves, the subtle flair of a Dog Leg, the elegant spread of a Fishtail, the organic charm of Leaf patterns, the graceful sweep of a Rainbow design, or the secure containment of Retainer grooves, you’re investing in a detail that elevates both the utility and the aesthetic of your kitchen.
While the initial cost and the commitment to a permanent feature are considerations, the long-term benefits of convenience, cleanliness, and enduring style make drainage grooves a compelling choice for many homeowners in the UK. By discussing your vision with experienced granite professionals, you can select or even customise a design that perfectly complements your granite worktop, turning it into a true centrepiece of functional elegance in your home. Explore the options, and you might find that these carefully crafted channels are the perfect finishing touch your kitchen deserves.
Frequently Asked Questions (FAQs)
Q1: How deep should drainage grooves typically be in granite?
A: Drainage grooves in granite are typically cut to a depth of 3mm to 5mm. This is deep enough to channel water effectively without creating awkward indentations or significantly weakening the stone.
Q2: Can you have drainage grooves with any type of sink? (Undermount, Belfast, inset)
A: Yes, drainage grooves can generally be incorporated with most sink types. For undermount sinks, they usually run right up to the polished sink cut-out. For inset sinks, they stop just before the sink’s visible lip. With Belfast sinks, the groove layout is often designed to complement the sink’s prominent front and traditional style. Always discuss compatibility with your fabricator.
Q3: Do drainage grooves get dirty easily?
A: If wiped down regularly as part of normal kitchen cleaning, drainage grooves in polished granite don’t get excessively dirty. Simpler designs like straight grooves are very easy to keep clean. More intricate patterns might require a soft brush to clear any debris from tighter curves or corners. The key is regular, gentle cleaning.
Q4: Is it better to have more or fewer drainage grooves?
A: There’s no definitive “better.” It’s a balance. Five to six grooves is a common and effective number for many standard drainer areas. More grooves can, in theory, carry more water or cover a wider area, but too many packed closely together can make cleaning between them slightly harder and might look cluttered. Fewer, wider grooves can also be effective. Discuss with your fabricator what’s optimal for your space and usage.
Q5: What’s the most popular drainage groove design in the UK?
A: Straight drainage grooves remain consistently popular in the UK due to their clean look, ease of maintenance, and cost-effectiveness. However, designs like Fishtail and Dog Leg are also widely chosen for adding a bit more visual interest without being overly complex. The choice often reflects the overall kitchen style, with contemporary kitchens favouring simpler lines.